Thursday, January 18, 2007

Shabby Chic Sale...again!!

I can't believe it!! Yet another sale. Starting tomorrow until the 21st January 2007, there will be 25% - 50% off selected items. That's the problem really...what exactly are "selected items"?? I'm thinking of actually calling them up tomorrow to ask.

Ordinarily, I wouldn't be that fussed and would probably just pop over to have a look at what's up for offer, for want of something to do over the weekend, but being 36 weeks pregnant and expecting the baby to pop out anytime soon kinda puts me off from making an excursion to the Mall. Not only that, when I got the message in the car just now and exclaimed excitedly over it, the disapproving looks from the Hubby almost made me want to melt into the carseat. Hehe.

I'm pretty happy today though cos a shipment came in from Scrapping Gals and I have new books and magazines to read, new acrylic paints (MM glazes and metallics) to play with and a new font (Vixen) for my Quickutz. Hooray!!

Wednesday, January 17, 2007

Choco Fiend and Shape Punches

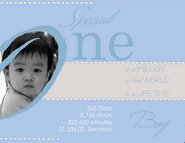
Latest layout that was completed in record time...yes literally done in one night. Even I couldn't believe it. Quick and simple. I had 3 pictures to scrap and it did take me a couple of days of sitting and staring to try and figure out what to do but after deciding to only use 2 pictures (yes, credit for that decision must go to the Hubby) the layout came together pretty quickly.

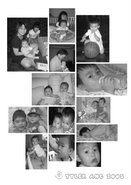
I gotta admit, Ty did not get as messy as his cousins. Mainly cos we arrived late and he seemed more interested in playing with the satay sticks and bowls of ice water rather than actually eating the chocolate covered fruit. But at least his mouth got a litte dirty. Hee. The fountain was delicious though (hint hint to BF to try that other pack of dark chocolate that I know you have - Haha).

Non-scrapbooking tip to anyone who owns a chocolate fountain: DO NOT pour cold milk to try and dilute the chocolate while it is in the fountain. We managed to clog up the entire thing and had to dig out all the chocolate. The texture of the chocolate dip had also changed and the whole thing went downhill from there. :-(


Materials: Textured Cardstock: Bazzill Basics Paper; Patterned Paper: DCWV (Retro Stack); Vellum Phrase: DCWV Vellum Quote Stack; Alphabet Stickers: S.E.I; Alphabet Rub-ons: Scrapworks, Alphabet Die-Cut: Quickutz (Ginger Mini Font); Staples: Making Memories; Ink: Tim Holtz Distress Ink (Black Soot); Pen: ZIG Millenium (black) and ZIG Opaque Writer (white); Circle Punch: EK Success Whale of a Punch.


This Layout was inspired by an article in the January edition of Creating Keepsakes ("CK") magazine and also a bit of a scraplift. It was an article about not spending too much money on scrapbook supplies and how one can go on a "diet" from the spending. One of the tips was to save on paper by punching shapes out of them instead of using whole blocks of paper. The layout looked neat and simple and the emphasis was on using smaller portions. I had chosen the pattern papers I wanted for the layout but was having difficulty trying to arrange the elements. Punching circles was a fab idea and voila.


I got the circle "Whale of a Punch" (as pictured below) from Laine's Papeterie in Singapore. It costs a bomb ($32.90) but I think it's completely worth it. I also have the square, flower, swirl, and several tag shapes for this range. Oh let's not forget my Mickey Mouse one (no idea why I bought it but thought it'd be good for a Disney layout when I do get around to going).


I like punches and invest a lot of money in them (have a whole box full of big ones plus a plastic drawer full of regular sized ones). The EK Success punches are the best as they have levers which makes punching a breeze. You can get them in all sorts of shapes and sizes. Pictured below are the 1" circle punch (orange one) and a corner adorner puncher (yellow one - for punching designs on the corners of your pages).


I also have the standard McGill punches for squares and circles but they are more fiddly to use as it uses the standard "push button" mechanism that can make it hard to set or measure accurately if you want to save paper (I have to set mine on the table and stand up to push down hard on the buttons).


Marvy Uchida is another brand that does lever style punches and I have two huge ones (circle and tag) bought from Scrapping Gals. Also a great buy. So far, Laine's is the best place for punches as they bring in a pretty good variety of the EK Success brand.


You can get punches for alphabets, all sorts of shapes and in all sorts of sizes. Pictured below is another type of punch for borders by Fiskars. Haha as you can tell, I have not even used mine yet as it remains in its original packaging. The Fiskars border punch is long (about 6") and is really good for 12x12 pages. You can also get mini border punches by Carl but these would be the normal shaped punches with the "push button" mechanism.


Tips for caring for your punches: Periodically punch waxed paper (or grease paper) to keep your punches "oiled" and aluminium foil to keep them "sharp". Remember, punches are a good investment as they can be used over and over again so long as good care is taken of them.

Sunday, January 14, 2007

Stickers and Rub-Ons Sale at Shabby Chic

Whew this post is rather late as the sale started yesterday. Check out the link made by Ranoadidas for more information. It sounds like a pretty good sale (esp for VIP members cos it sounds as if VIP members will get a total of 30% discount).

I didn't manage to go yesterday cos I was really busy the whole day. Blood test in the morning (waited an hour), haircut at 11am (had to chop of the fringe) and clinic at half 1. By the time I finished all my appointments, it had started to pour heavily so i couldn't even go grocery shopping.

Hopefully I will be able to go today as I would like to see if I could pick up any alpha stickers or rub-ons. This will of course depend on whether the Hubby will be willing to drop me off as I'm not keen on looking for parking at the Mall on a sunday. Note to self...be extra nice to him!!

Saturday, January 13, 2007

2 of a kind

I was re-organizing my patterned paper stash by brandnames (a lot easier than organizing by colour) and I realized that I had tons of paper by Basic Grey (love their distressed look) and have never even used a single one. EEPS!! So I decided the next layout must definitely be a Basic Grey layout no matter what.

I do not have many good photos of Ty with my parents or even my parent-in-laws so I was really happy to get these photos of Ty and my Dad on xmas eve.


Materials: Patterned Paper: Basic Grey; Chipboard Number, Acrylic Paint, Paper Edger, Sandpaper, Metal Washer and Metal Phrase Eyelet: Making Memories; Chipboard Alpha and Date Stamp: Heidi Swapp for Advantus; Ribbon: American Crafts; Ink: Tim Holtz Distress Ink (Antique Linen) and Cat's Eye Chalk; Paper Scuffer: Lasting Impressions; Circle Cutter: Kuretake; Corner Rounder: Carl.

I must admit, I'm not a big fan of the vintage distressed look. I do own the Making Memories Distress Kit and several Tim Holtz Distressing Ink pads but I rarely use them. In fact, I only bought the Distress Kit for the bone folder and paper edger. I've inked the edges of paper before but not with Tim Holtz ink pads. For this layout, I decided to accentuate the Basic Grey paper by going all out. Distress photos, paper and title!!

It is hard to tell but the photos were roughened with the MM Paper Edger and scuffed further with a paper scuffer. The chipboard was the most time consuming thing to do but also the most fun. As the chipboard were all raw, I painted the first layer white and when dry, I painted them all blue. Then I got to work with the fine sand paper from the MM Distress Kit. I love the effect of sanding but again it is hard to be able to tell from the photo.

The circle paper was a misjudgment on my side. Cut the circle much too small so for space filler, I cut out the circle patterns from the paper. So if you look under the photos, you find a mess of holes. Hehe.

The ribbon was the final touch. I had bought a whole lot of American Crafts ribbon from Shabby Chic but missed this pattern completely. I just could not find the right one from my stash. As luck would have it, I was at the Ritzqun for a wedding dinner on the 30th Dec. Not a good time to go to the Mall for sure. Took us 45mins to get into the area itself. During dinner, told The Hubby I had to pop out to the loo, then did an escape run for the 3rd floor. Hee. That was probably the longest loo visit ever. Hahaha.

Sunday, January 07, 2007

Useful scrapbooking terminology

I did a pretty dry introductory post on what is scrapbooking sometime in November 2006 at my brother-in-law's suggestion. I have since, met online thru my blog, another avid scrapper who did what I thought is a really great post on the terminology used in scrapbooking. Check out Scrap-pa-way's post on What is... for more info on scrapbooking. Cheers Shaz.

Little Braveheart

The Hubby was a star today. He pulled out the camera and my album and went off to take pictures of some other layouts that I have done. Unfortunately, the camera battery was low. By the time the battery had charged, it was close to noon and the weather had turned a little grey. Nevertheless, he went to his usual spot on the balcony to catch the natural light. And we almost lost a layout!! Wah I think his heart must have stopped when the wind almost blew the page off the balcony. Hahaha and it is a page with a giant button sewn on it. He reckons that without the button, the page would have gone a flying for sure! Whew!!

I really like these photos of Ty. He literally had crayon marks all over his face, on his tongue and teeth and all over his fingers. The shock I had when I saw his face was almost akin to the shock I got when he poured an entire container of Bicarbonate Soda into his mouth and started frothing. This was when he was about a year plus. That was definitely not a time for pictures.


Materials: Textured Cardstock and Button: Bazzill Basics Paper; Patterned Cardstock: Daisy Ds; Alphabet Stickers: Pure Juice for Memories Complete; Ribbon Brads: Making Memories; Woven label: MAMBI; Embroidery Floss: DMC; Ink: Tim Holtz Distress Ink (Antique Linen); Font: Couriers New and Comic Sans.


I learnt a new thing with this layout. NEVER EVER PRINT YOUR JOURNALING ON TEXTURED CARDSTOCK WITH A LASER PRINTER. You would have thought that the quality of print would be much better if you use a laser printer. Funnily enough the laser ink does not stay on textured cardstock. Run your fingers over the print and the ink comes off!! Most annoying!! I couldn't be bothered to waste any more cardstock so I just used what I had. My sister-in-law, BY, said that the rubbed off ink adds to the distressed effect but I just worry my journaling will disappear. Eeps!

I also went a little mad in trying to complete this layout. I had everything glued on except the giant button. It was the last thing that needed to be done and I just wanted to complete it! At home, I realized that I did not have any orange thread for the button. I tried clear glue but it showed through. Blaah!! My mother-in-law does lots of quilting so I nicked a roll of orange thread from her but thread is too thin for such a big button. I needed embroidery floss and fast.

The next day at work, all i could think of getting out and buying floss. I knew there was a shop behind the IBB Carpark in town that sells floss for cross-stitching. At noon I walked over but the shop had closed!! Grrrrrr. Called LJ (who does cross-stitching) and asked if Hua Ho Yayasan would sell any and she said I had to go to Hokko in Kiulap or go to her place in Madang as she has loads. She was home for lunch but i thought, nah I'll never make it all the way to Madang then back home to do my layout if i wanted to be back in the office by half 1. It was already 12.15pm when i zoomed off to Kiulap. Lucky for me it was December and school was out so there was no traffic. Got the orange floss, zoomed back home to Subok, had Indomie for lunch and sewed the button on. Voila, my layout was done and I even managed to get back to the office at half 1. Whew! Talk about obsessed. Hee.

Saturday, January 06, 2007

Cardstock sale at Shabby Chic

I got a text last nite telling me that Shabby Chic is starting a sale on all their Bazzill cardstock from today till the 12th January 2007. For a minimum of 10 pieces, one can get 10% off. VIP members get an additional 5% off. Check out www.ranoadidas.com for more details.

I made VIP membership on my birthday last month and that entitled me to 20% off everything in the shop. Needless to say I spent over an hour there and went home with a shopping receipt about 5 feet long. Haha. Luckily the Hubby did not come along.

So its a Saturday today and you will be sure to see me at Shabby Chic after lunch. I've always said it and I'll say it again...you can never have enough cardstock in every colour. I hope the sale also applies to the Bling Cardstock packs. Love them!!

Happy Birthday Part II

The Hubby took a picture of the birthday card I made for him. So I thought I might as well post it too. It was a really last minute thing, created in the wee hours of the morning while my boys slept. I had bought a metal and leather frame in Takashimaya, Singapore for the Hubby and wanted to create something to put in it. Because the frame I had bought was not a shadow box frame (Shadow Box: a frame that is about 1 1/2" thick and allows space for 3-D embellishments) I was restricted to flat embellishments. Ribbons and stickers. But I could not resist using new epoxy alphabets I had bought from Shabby Chic. By Brenda Walton for K-ology (K&Company) they are really small and I think pretty versatile. A good buy for only $9.90. Just so you know, I went back to Shabby Chic and bought myself a second pack for keeping.


Materials: Textured Cardstock: Bazzill Basics Paper; Patterned Paper: Karen Foster; Ribbons: American Crafts; Photo Corners: Chatterbox; Sticker: Sticko by EK Success; Epoxy Alphabet: Brenda Walton for K-ology, K&Company; Date Stamp: Heidi Swapp for Advantus; Ink: Kaleidacolor by Tsukineko.

Friday, January 05, 2007

At the Beach

My first double page 12x12 layout (finished ages ago but had difficulty uploading). My sister-in-law, BR, is a great kids photographer. She always manages to get great photos of the kids and she took these photos of Ty at the beach. She uses film so i had to borrow her negatives and had to print all the pictures. I knew this had to be a double page layout cos I had at least 11 pictures to scrap. Being "kiasu" of course, i developed my favourite photos in 5R (talk about being ambitious) and the rest in 4R plus i could not bear to leave any pics out. So this layout took me ages to plan out in order to get everything to fit nicely and i still had to leave out about 3 pics.


Materials: Textured Cardstock and Mulberry Paper: Bazzill Basics Paper; Photo Corners: 3L, Acrylic Paint, Tagmaker, Rectangle tag, Eyelets and Brads: Making Memories, Ribbon: EK Success Adornments; Chipboard Label Holder: Heidi Swapp for Advantus; License Plate: Sticker Studio; Transparency: Grafix; Tag and Brad: Queen & Co.; Paper Tearing Ruler: Plaid.

  • The Mulberry paper was supposed to evoke water. I wet the tip of a cotton bud with water and drew wet wavy lines on the mulberry paper. Then I just tore the paper along the wavy lines. The tearing gives the paper a textured effect because of the fibres of the mulberry paper.

  • For the focal photo that is double matted, I used a paper tearing ruler to create the wavy edges. It was not easy tearing cardstock and i actually tore the edge of the mat. Bazzill Basics Paper unfortunately does not have a white core (for cardstock with a white core, I have only been able to find DCWV Cardstock stacks at Laine's Papeterie in Singapore). So when i tore my cardstock, it did not have the effect i wanted so i used my white acrylic paint (MM-Spotlight) to paint the edges. LOL talk about cheating. Hee.

  • I think my colour scheme was a little too plain and boring but i really got tired of trying to do this layout that i just didn't bother anymore so long as everything matched. My photo corners were painted blue (to match of course-how exciting). I find that MM's acrylic paints do not stick so well on plastic materials. I was told at Laine's that there are new types of acrylic paints that are much better and would stick on plastic and metal. They were carrying the brand but i've forgotten what the brand name is. I did not pay much attention as i had already invested in most of the MM paint sets and they were selling these new ones individually. Ouch on the wallet so turn away, turn away.

  • I had fun printing my journalling on transparency. I had been searching high and low for transparencies and now www.scrappinggals.com do sell them by the sheet. The ones i have are for printing with bubble jet printers and they have a sort of textured side on which the ink would stick. Do note that these transparencies are sold for specific types of printers. So i could not run the ones i have thru a laser printer.

NB: Please don't mind the bullets. I seem to have a problem with spacing my paragraphs, i.e the spacebar doesn't seem to work and all my paragraphs were lumped together which makes it hard to read. If anyone knows of how to sort this out i would be really grateful. :-)

Thursday, January 04, 2007

Scrap-lifting

This is a blatant scrap-lift from one of Ruey Chong's layouts that she posted on her blog. I fell in love with her layout (Gappy Grin) the minute I saw it and when I got the photo of Ty and his cousin, Kholil, developed, I thought that the photo would work well with Ruey's design. Thanks very much Ruey for the inspiration.
Scrap-lift: To copy an existing layout design/format but to make it your own with different paper and embellishments.


Materials: Textured Cardstock: Bazzill Basics Paper Bling; Patterned Paper: Karen Foster and Junkitz; Flower, Alphabet Chipboard and Date Stamp: Heidi Swapp for Advantus; Acrylic Paint, Tagmaker and Circle Tag: Making Memories; Rub-on: DCWV Quote Stack; Ink: Zig Embossing Pen; Circle Cutter: Kuretake.


  • The bling cardstock and patterned paper were bought from Shabby Chic at the Mall and it was a fabulous feeling to be able to shop for paper with a photo in mind. Most of the time, I am only able to buy whatever catches my fancy as there were no scrapbooking shops available in Brunei not too long ago. Once I got home with my new buys, I got to work immediately.

  • Because the design for this layout was a scrap-lift, it did not take me very long to complete. The only difficulty I had was finding patterned paper with patterned circles that I could cut out. I did not have much choice on this and consider myself lucky to find the Junkitz paper with some circles printed on. At the end of the day, I still did not have enough cut out circles to achieve the same effect that Ruey got on her layout.

  • I rather liked the end result of this layout but funnily enough, most of the comments that I got from family was that this layout was "not me". They have attributed this to the fact that it is a scrap-lifted design and that my style of scrapbooking is a more linear and clean lines sort of style. I guess they are right in that sense but hey it was still fun doing this layout so no regrets there.

Happy Birthday!!

We celebrated the Hubby's birthday in November 2006 but I only completed the layout below in December. This is my first non-Ty 12x12 layout ever (finally eh) and I guess it is fitting that it is of the Hubby. The Hubby's friend has already commented on how come there are no pictures of the Hubby in any of the layouts that have been posted, so to Mr. B5000 here it finally is. :-)


Materials: Textured Cardstock: Bazzill Basics Paper; Patterned Paper: The Paper Patch; Snaps: Making Memories; Photo Corners: Heidi Swapp for Advantus; "Happy Birthday" laser-cut title: Go West Studios; "The Big 30" die-cut title: Quickutz (Marisa font); Clear Embossing Ink: Ranger; Ultra Thick Embossing Enamel: Suze Weinberg; Rubber stamp: Hero Arts; Watermark Ink: Versamark by Tsukineko.


This was the layout that I mentioned in my previous blog regarding embossing small die-cut letters with Ultra Thick Embossing Enamel (UTEE). The results for the title "The Big 30" came out really great (painstakingly done and at the expense of the tip of my Quikstik). It was really glossy because I had to re-do the UTEE several times to cover bald spots. The "Happy Birthday" title was less so because I only did one layer of UTEE and the cardstock colour was pale yellow.

This layout also represents my first time at tearing paper. Yes, I think the general reaction would be..."WHAT the 1st time??!!" but hey I am more of a neat freak when it comes to my pages. I think family will be glad to know that I am letting go of this anal nature and that I am beginning to realize that a little imperfection is actually ok. I actually enjoyed tearing paper.

Quick tip for the day: When you tear paper, make sure that you pull the paper directly towards your body and not sideways as you will get a better textured tear that way. (Credit for this tip goes to my cousin LJ who learnt it in her class at Laine's in Singapore - Cheers!).

By the way, do check out LJ's blog at http://jazzscraps.blogspot.com.

My mom saw this layout and was so enticed by the picture I took of the cake (mango flan from the Sheraton Hotel) to the point that she asked me to order the same cake for my own birthday just a week or so ago. I didn't mind as the cake is delicious!!

I'm not sure if you can tell from the picture above but I experimented with watermark stamping on the red paper. I used a rubber stamp and Versamark's Watermark Ink. The effect was rather good actually but I got overzealous in my stamping and the crazy randomness of it did not turn out so well...the messiness of the stamping did not appeal to me at all.

All in all, this is not one of my neatest layouts but at least it got done.

Funny Dates and news

I just did a post on Preparing for Baby and the date for the post came out as December 11th 2006 even though i published the post like 2 minutes ago. I am not sure if it is because I created the draft post ages ago or if it is my log-in dates that has gone haywire so please bear with me. This is not the first time this has happened to me.
I suppose it is no big deal except that the accuracy of the dates for my blog posts is now gone with the wind. LOL.
Other news today is that i received a really nice comment (my first and only comment so far since I started this blog) from Shaz who is a scrapper from Kuala Lumpur, Malaysia. Thanks Shaz for the plug on your blog, http://scrap-pa-way.blogspot.com. Do check out Shaz's blog for tips and techniques on making your own accordion albums (which I am planning on trying out!!).