Monday, December 11, 2006

Preparing For baby

Wow, finally I have managed to upload pics of my layouts onto my blog. My Hubby was away for a week and a bit in Dec so i had to wait for him to come back for help uploading. Then when he manged to get around to doing so, the pictures were too small and could hardly be seen. Fresh uploading of pics met with serious internet access issues for me at home, then to the whole Asian region due to the earthquake in Taiwan. But it seems we're back in business and just in time for the new year too. The post below was written ages ago but just never published. Hee.


Materials: Textured Cardstock: Bazzill Basics Paper; Patterned Paper: DCWV Text Stack; Epoxy Alphabet: S.E.I; Alphabet Rubons: Making Memories and Heidi Swapp for Advantus; "Special" tag: Wild Asparagus; Ribbon: Making Memories; Metal Tag and brads: L'il Stackers by American Traditional Designs; Quilling: Jolee's; Embossing Pen and Opaque Writer (white): ZIG by Kuretake; Clear Embossing Powder: Ranger.

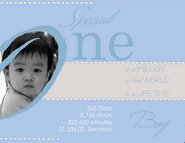
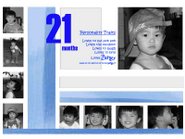
I was reading Simple Scrapbooks (again forgot which issue...sorry - too lazy to trace) and there was an article about scrapping without pictures. Inspired by this article, I dug around in a box in which I had kept memorabilia from Ty's birth. I found pictures of his ultrasound scans, a receipt from Amazon for baby books which i had ordered prior to his birth and the JPMC card in which his scans were given to us. Scrapability for all!! I chose the baby text paper from my DCWV stack. It was green. Not my favourite colour but i figured what better time to use it. Overall, I was pretty pleased with the end result as it was quick to put together but my favourite critic, Hubby, doesn't like the layout at all because of the colour.

I sprayed the Amazon receipt and the JPMC card with Acid-Free spray just in case even though I did not use any photos in the layout. Maybe the spraying will prevent the items from discolouration. The Acid-Free spray is available from www.scrappinggals.com and is pretty expensive as it does say that it is only good for 8 sprays or something (having said that I think I have used my little spray can more than that so....). A little can costs about $40 something.

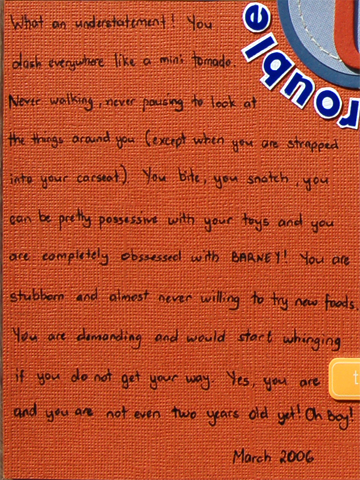
This was the fastest layout I have put together so far as it was only a matter of arranging the memorabilia on the page. Journalling was very basic and handwritten in a "list" format with white pen on black cardstock and hidden behind the JPMC card.

On hindsight, I should have inked the edges of my patterned paper to give it a more distinctive look since my background cardstock is also green but I was rushing the layout in an attempt to challenge myself to finish in as little time as possible. Hence the incomplete feeling I get everytime I look at the layout. Oh well, lesson learnt. I guess I am not the rush-rush scrapper. LOL.

Crazy Sale News

Pictures 2 Pages (www.pictures2pages.com) in Singapore has extended its Crazy sale till the 31st December 2006. The same discounts apply, as in 20% off items priced in black and 10% off items priced in red. If you know of anyone going to Singapore now for the holidays, be sure to be extra nice and sweet to them and then get on your knees and beg them to bring your order home for ya cos i think this is a sale not to be missed.

What's more, i've been working on 2 layouts over the weekend (and great news is that I actually FINISHED both!! Hurrah!! - watch this space as they will be posted soon) and for one of them, I had this great idea of embossing my die-cut title with UTEE (Ultra Thick Embossing Enamel) to make it look glossy. Unfortunately, I did not count on the little alphabets flying around as soon as I turned on my Heat Tool. On reflection, after I had spent a half hour longer than anticipated working on the title, i thought that if i had some glitter it would have been far far easier to decorate my title. Would probably stand out more as well and i started dreaming of the new Making Memories Shimmer sets. Then when i checked out Pictures2Pages this morning, the new Glue Dots glitter are in. It's a sign!!! What's even better you ask...my parents will be in Singapore for a short trip this week. So yes, there goes some more of my savings but all in all...for a good cause wouldn't you say. LOL.

Happy shopping all.

Friday, December 08, 2006

The Beginning - oooeer

This was my very first attempt at a 12x12 page layout. Very simple and basic scrapbooking I think. My efforts at making the little foldout booklet containing more photos did not turn out very well as the ribbon tie is really for show only and does not hold the booklet close AT ALL!! Oops!! I had already stuck the picture on the front of the booklet before realizing the ribbon had to go over ithe photo in order to secure the whole thing. And of course I did not want any ribbon to mar the photo hence the "for-show" ribbon tie. Oh well...a better attempt next time!!!

But aren't the photos sooooo cute!! Ty (in the Tigger outfit) and his cousin, Yu Shiuan (piglet of course) were born only 2 days apart and when they were 6 months old, we brought them to Universal Photo Studios for a studio shoot. Ty had gotten the piglet outfit as a gift from my aunt, Hjh Adina (who meant to give it to my cousin's child Aqilah but did not realize it was a piglet so we lucked out except that it is pink...not that the colour stopped us from letting Ty use it for as long as he could fit in it - metrosexual colour bah). The Tigger outfit is a hand-me-down from I dunno who.


Materials: Textured Cardstock: Bazzill Basic Paper; Patterned Paper: Chatterbox and We R Memory Keepers; Alphabet Stickers: EK Success; Epoxy Tiles Play: Sticko for EK Success; Pen: Zig; Ribbon: Pictures2Pages; Photo Corners: Chatterbox; Alphabet Rubber Stamps: Hero Arts; Ink: Tsukineko; Paper Punch: EK Success Whale of a Punch.


I must admit I am not very good with patterned paper. Love buying them but can't seem to use them properly. The Chatterbox brand of papers are really nice and they come co-ordinated by "rooms" and are double sided. The paper I used above is from the Sun Room collection and it was pretty easy picking for me as i wanted something to match the orange of the Tigger outfit.

My cousin, LJ (who is scrapbook crazy now) just came back from joining a beginner and intermediate class in Singapore at Laine's Papeterie (located on the 3rd Floor of Wheelock Place - same floor as Birkenstock) and she was told that we should choose our patterned paper first and then choose the co-ordinating cardstock. That sure was news for me as i almost always choose my cardstock first to match the photos and then I trawl thru my paper stash for matching paper. When you think about it, it does seem easier to choose patterned paper first. So that is the quick tip for today. :-)

Tuesday, December 05, 2006

The Importance of Being Sticky

Without adhesives/glue, scrapbooking would not be possible. Adhesives are really important and I thought it would be worth blogging about the many different types of adhesives there are in the market. Many beginner scrappers do not realize the value of adhesives and how many different types are actually available. You can get both permanent and repositionable adhesives.

When i do a page, I can use as many as 4 different types of adhesives. That's on one single page!! Different elements on your page may require different adhesives to make sure they stay on your page properly. Of course it is perfectly alright to use just one type of adhesive and i would recommend roller tape glue. It looks like correction tape and is really easy to use. Shabby Chic at The Mall sells the Tombow brand for $3.20. I am currently using the Pritt brand as seen below. I use the roller tape glue primarily for sticking my patterned paper onto my pages.


I use photo mounts when sticking my photos on mats on on my page. There's no actual "sticky" reason as to why i use photo mounts for my photos other than i find it is cheap to buy. But I also do think that they hold my photos better. The ones i use are from Australia.
Other types of adhesives that i use are photo corners (for things that i do not want permanently stuck on my page. I have used photo corners as a decorative element too. If i find that i do not have the right colour for my page, all I do is take out my acrylic paints and paint my photo corners the exact colour i want. Photo corners can come in many different types of style and colour. The ones in the photo are basic ones which comes in clear, white, gold, silver and black. Big name manufacturers like Making Memories and Heidi Swapp also make their own stylish ones like woven and metal corners. These do not actually hold the photo but only gives an aesthetic effect.


Glue Dots are another great type of adhesive. Glue Dots describe the adhesive and is also the actual brand name too. They come in a 3 types of sizes (2 of which are shown here). They have also produced Continuous Glue Lines, Pop-Up Dots and Vellum Dots. The box packaging shown here is the old type. New packaging comes in flat plastic packs which are much easier to store. Glue Dots are really sticky so make sure you position your photo or embellishment in the right spot cos there is no turning back without doing some sort of damage to your page at the very least.


The Glue Dots shown above are the Memory Book Dots (medium sized), Mini Dots and Glue Lines.

Vellum glue is also a must have if you like working with Vellum paper which is akin to tracing paper except it is of thicker quality and has a kind of sheen on one side of it. Normal glue will show right through the vellum so it is imperative that the right glue is used. I use Scotch 3M Vellum tape as seen below but my sister-in-law and cousin have both told me that it also does show through their vellum after awhile. I myself have not had a problem with them but the Vellum Dots produced by Glue Dots advertises itself as the only vellum glue in the market that does not show AT ALL!!


If you like using liquid glue, there is also the ZIG 2-Way Liquid Glue made by Kuretake. These come in 3 types of pens. Fine tip, medium tip (which is like a flourescent marker pen) and the super fat tip. Only the first 2 are shown below. The Fine tip glue pen is pretty nifty for small die cuts. They are called 2-Way glue because they can be both permanent and repositionable. Leave it to dry slightly before putting it on your page and it becomes repositionable meaning you can pull off the element easily and stick it elsewhere. Attach the element to your page while the glue is still wet and its becomes permanent.


If you want incredibly super sticky glue then the Terrifically Tacky Tape by Provo Craft is the one for you. I found these in Singapore at www.pictures2pages.com and fell in love with them instantly. They come in 3 width sizes and are completely worth the money you pay. It works like double sided tape and is clear so you could also stick glitter and small beads on them.


If you want to give your element or embellishment a 3-D effect then use Pop-Up Dots, 3D Dots or foam tape. You can get normal Scotch 3M brand of foam tape from anywhere like Hua Ho or Utama Grand but these are not acid or lignen free so i would be careful when using them near your photos. I am using Francheville Foam Tape at the moment but 3D Dots (see below) are more widely available in all scrapbooking shops or online sites. Shabby Chic now sells the Pop-Up Dots (Glue Dots brand).


The last type of adhesive I use is the Xyron Create A Sticker Maker. I absolutely love this!! Xyron produces these sticker makers in all sorts of sizes but i find the 150 model the easiest to carry around. I use it to make my die cut alphabets or pictures into stickers cos sometimes trying to glue little alphabets onto your page can be fiddly. I have also found that using the Xyron for ribbon is fantastic. Just run your ribbon through the Xyron and voila, your ribbon becomes like a sticker which makes it a breeze to stick on your page.


You could also use the basic glue stick which looks like the standard UHU Glue stick. I find that these do not stick as well as other glues but they are really cheap and widely available in Brunei. I have found the AMOS brand selling in Hua Ho and Bismi.


So the next time you go to Shabby Chic or browse through an online scrapping site, check out the adhesives section. And now hopefully you will know which type of glue to get to best suit your scrapping needs!

Friday, December 01, 2006

Layout sizes

Standard scrapbook pages come in 2 sizes. 12x12 and 8.5x11 (which is slightly smaller than an A4 sheet of paper). Of course you can get many different sized albums these days in sizes like 9x9, 8x8 and 6x6 albums plus many more different sizes. The more affordable and widely available 12x12 albums are from Making Memories and they come in various colours in a linen or faux leather finish.

It is advisable to not layer too much paper and/or cardstock on the edges of your layouts as you may find it difficult to get your pages to fit into your page protector. I have that problem with the Nana & Me layout below. I placed my photo and patterned paper flush on the edge of my cardstock base thereby resulting in thick edges. So now i find it hard to get my page to fit in the plastic page protectors of the album and even more so if i try and fit a second layout on the other side of the page protector.

Colorbok produces albums called the The Perfect Scrapbook Album and Making Memories used to produce the Perfect Fit Albums. There are also other brands that advertise themselves as being the perfect fit for 12x12 pages so i gather the problem i have of trying to fit my thick-ish page into my album is a common occurrence. I have the Colorbok album but have not used it yet so whether or not it is true to its calling card, that i do not know.


This is the Colorbok Perfect Scrapbook Album, called as such as they claim that there is no need to trim your pages to get them to fit nicely.


I am using a Making Memories 12x12 album for Ty's pages (see above - blue linen with label holder). And when i saw the photo of my Mum and Ty holding hands, I immediately knew that the photo had to be enlarged to the maximum. I enlarged the photo to an 8x12 in order to fill the entire length of the page and put my journalling strips on the other side. The 4 little pictures at the bottom were a last minute decision and only because I couldn't decide on a space filler for that spot.

You might notice that the second cardstock strip on the layout is blank. The Hubby blanked it out as it had my parent's address on it. I didn't even know he did it till after I posted this.


Materials: Textured Cardstock: Making Memories and Bazill Basics Paper; Patterned Paper: Junkitz; Twistel and Acrylic Paint: Making Memories; Chipboard Alphabet: Heidi Swapp for Advantus; Photo Corners: Chatterbox; Tag and Brad: Queen & Co.; Alphabet Rubber Stamps: Hero Arts; Pigment Ink: Ranger.

Thursday, November 30, 2006

Uh Oh Here Comes Trouble

Hurrah more photos of my layouts. Hubby finally had time to take pictures of my layouts and i think the photo of this one has come out much better than the first one.
This placement of the paper and photo was inspired from a layout i saw in Simple Scrapbooks magazine (forgot what issue). This is one of my favourite layouts.


Materials: Textured cardstock: Bazzil Basics Paper; Patterned Paper, Stitched Tag: Chatterbox; Alphabet Chipboard: Heidi Swapp; Acrylic Paint, Word Tile and Alphabet Stickers: Making Memories.


If you can even read my really bad handwriting...congratulations!! Personally i detest my handwriting and i've even bought a book by Heidi Swapp called Love Your Own Handwriting which has exercises in it. I have not had a chance to go through the book properly yet (as i have tons of scrapbook idea books and magazines to read) but one of the things that Heidi Swapp strongly advocates is the use of your own handwriting in your pages, regardless of how bad it is. One day, when i'm long gone, perhaps my great grand children will look at this page and yes they will probably say "Damn what ugly handwriting great grandma had" but at least they will know what my handwriting looks like. Hee.


The original journalling that i had drafted for this picture was about my hopes and dreams for Ty and how i hoped that he would follow his own personal dreams but my brother-in-law said that it did not match the cheekiness of Ty's photo. And how right he was!! Cheers JW. (By the way, i still have not found a photo to match my original journalling...meaning to say there are no angelic photos of Ty!! LOL)

The MM Alphabet Stickers were stuck on white cardstock and painstakingly cut out by hand with my trusty Precision Tip Cutter Bee Scissors in order to make them stand out more. I was lucky enough to find acrylic paint (Poppy) for my raw chipboard letter 't' that perfectly matched the cardstock.

Tip: The front of the page looks normal but turn the layout around and you'll find gaping holes behind the picture and patterned paper. I cut them out as no one looks at the backs of the layouts anyway and I get to keep the cutouts as scraps for diecutting, punches or even as mats for other photos.

NB: The photo of Ty was taken by Hubby in March 2006 with my brother's trusty Canon 10D.

Sunday, November 26, 2006

Family

My family held its 13th Annual Golf Tournament today at the RBGCC. The golfers played in the morning and the rest of the family met up for the luncheon which was at Grandstand 3 (a really great venue cos it is air-conditioned and large enough that we weren't all squashed together). It is always an occassion for fun and laughter as the family is quite extended and we do not really meet each other on a regular basis.

More often than not, i would have to ask who the little kids are and what are their names. A sign that i'm getting old as i can never remember all the names of my second cousins. But what i cherish most on these occassions are the photo opportunities that we have for the older members of the family. The missing faces of many loved ones today is a stark reminder for me to treasure the time we have left with so many of the family and more so, how important it is for me to try and scrap the photos of loved ones and to tell their story or the stories of events like today which we all enjoy and look forward to each year.

The scrap pages of such loved ones can be passed down to the younger members of the family who i am sure will treasure the photos and memories as well as the chance to get to know their elders albeit from created pages. I just hope that i am able to do this for my family and to do it well.


This is a picture of my grandfather at the 13th Annual Chua Trophy held on the 26th November 2006 and the inspiration for my blog today. The event was hosted by the family of Chua Kong Ann this year and the prizes for the tournament and lucky draw were fabulous (i-pod shuffle, home entertainment system, 2 mobile phones, digital camera, polaroid cameras, movie tickets, meal vouchers and more). Grand winner of the trophy this year was Uncle Adenan who has won it once before. 2nd place went to Uncle Brahim who has won the trophy twice before. 3rd place went to Sa-Chek (3rd uncle). My dad has also won the trophy twice and Tua-peh (eldest uncle) has won it once. So 7 wins out of 13 for my immediate family is a pretty good record i think and one that we are all so proud of!!

Friday, November 24, 2006

What is Scrapbooking?

My hubby is away on business at the moment so i'm unable to upload any more pictures of my layouts. So i thought i should finally write something about what scrapbooking is about.

In brief, scrapbooking is basically an extension of a photo album. Its more personalized and can be an outlet for your creative side. But to be really honest, i haven't got a creative bone in me at all. My layouts may not be as stunning as others and i may not be as quick in designing a layout but they are an extension of me and i'm proud of them all the same. So i do not believe that you have to be arty to do scrapbooking. A person just has to develop their own style.

The key thing about scrapbooking is that you need to make sure that you use acid and lignin free products. From your glue to your papers and embellishments. If you look back at your childhood photos, some of you may find them yellow with age and maybe even spotty discolourations. Apparently, if we had kept those old childhood photos in acid and lignin free albums, such discolourations would not have occured. The idea of scrapbooking with such products is that your photos will now last for generations to come and if you add meaningful journalling and captions, your kids, grandkids and great grandkids will be able to enjoy your albums as family heirlooms even after you are long gone.

Glue is another important factor for me personally. When i was in secondary school, the teachers used to give us handout notes which we were supposed to stick into out notebooks. I used double sided tape sometimes instead of the standard UHU stick glue and i remembered that after about a year or so, i could actually see the outline of the double sided tape thru the note paper. The paper would also turn yellow rather quickly. So if you were to stick your photos into your album with such double sided tape, i think you'll find that over the many years to come, your photos would eventually form the same discolourations.

When i started scrapbooking, i used cardstock and paper bought from stationery stores in Brunei that were not specifically acid and lignin free. Mainly because i had no choice available to me at that time. But i made very sure that all my glue (bought from Australia where i was first introduced to scrapbooking) were acid free.

For scrapping, one will need tools for paper crafting. If you're just starting out and are not sure about whether the hobby is for you, all you will need are a pair of good scissors, a craft knife, a ruler, a paper cutter (optional if you are good with a knife, ruler and a cutting mat), glue and a pen. I am really anal when it comes to my tools so i have different scissors for paper, glue and cardstock. I have different rulers for cutting, measuring and tearing. There is no need to invest in a tool kit unless you are really serious about the craft and if you are, then i would recommend the Making Memories Deluxe Tool Kit (see below) which will cater to your every need.


Once you have the tools, go develop your photos. Get some paper, cardstock and an album to keep your pages in and off you go.

Sunday, November 19, 2006

Layouts

When I started this blog, I just thought to make it an informative blog about scrapbooking in Brunei and the "trials and tribulations" that we Bruneian scrappers have to go thru in order to get supplies (well ok not so much of tribulations really...hee). But my brother mentioned to me that my blog was pretty un-interesting (in his words...boring...thanks Dude) as it contains no pictures at all.

Then on Saturday, at the grand opening of Shabby Chic, some friends of mine directed me to a blogspot called http://www.blessed2bestressed.blogspot.com/ and i was blown away. My orignal idea was to remain anonymous but now i realized that a scrapbooking blog should not be so and that i could do so much more with the blog. It was great fun to read Ruey's blog and Ruey, if you do come to Brunei as my friends have said you might, I would so love to meet you.

So now i have decided to change the objective of my blog. I'll still try and keep it as informative as possible but I will also try and upload my layouts (tho few they may be and so amateur-ish). I figure it will also be a good way for me to note down the materials used on the layouts and the story behind the layouts themselves. Who knows, i may use the same for a future layout on my scrapbooking.

Now the only problem i have is that i do not own a scanner at home. Attached below is a trial run done by taking a digital photo of my layout "Simply Amazing". My brilliant hubby did it for me last night and i so love him for it!! Just so you all know, i'm simply hopeless with IT stuff.

And another big shout out to my hubby whose digital layouts have been uploaded onto the blog's main page. Hurrah!!


Materials: Textured Cardstock: Bazzil Basics Paper; Patterned paper: Flair Designs; Alphabet stickers, foam stamps and acrylic paint: Making Memories; Epoxy stickers: Plaid; Corner rounder punch.


This was a fun layout to do. The mosaic tile paper actually came in a 12x12 sheet (bought from Scrapping Gals). It didn't seem to work right by puting the entire paper on the layout so i decided to cut out the individual tiles (super easy with EK Sucess's Cutter Bee Scissors). I was going to hide the journaling about how much Ty loves bathtime, especially bubble baths, with a 'pull-out' behind the focal photo but my hubby liked it clean and simple as it was. So this was a rare layout for Ty with no journalling or captions at all. Photos were taken in March 2006 (we took tons of photos during that month cos we borrowed my brother's Canon 10D with a 1GB memory card and went absolutely crazy!! It also turns out that my hubby is a pretty good photographer).


So now my blog site looks completely different from when it first started. We have had to change the colours of the site in order to accentuate the layouts better. I think it's looking great and i can't wait to upload more stuff onto it.

"Shabby Chic" in Brunei

Yesterday, a close friend virtually made my day with a simple phonecall. She rang me to tell me that a scrapbook shop called Shabby Chic (what a great name) had opened in the Gadong Mall. It was advertised in the BB and there was even an article on it in the back pages.

Wowee!! I couldn't contain my excitement and drove straight there after lunch. And there it was, on the 3rd floor right next to Solitude the bookshop. It turns out that the owner, Irene, is the sister of a friend of mine. The shop has a good variety of supplies from essential tools, albums, patterned paper, cardstock and embellishments such as brads, eyelets, stickers, rub-ons etc in all the big brand names from USA (Making Memories, S.E.I, Bazzil Basics, Wild Asparagus and Chatterbox to name but a few). I'm pretty well stocked up in terms of tools and supplies but even then, it was fun to browse around and examine stuff personally rather than online thru a computer screen. It was also great fun to chat with Irene about scrapping.

There was also a tool table for people to try out the various scrapping tools available. Irene has the Sizzix and Sidekick die-cutting machine for customers to try. I have never seen the Sizzix machine close up and it was fun trying it out finally. Personally, it is a little bulky but then you have the Sidekick for portability. The dies are also pretty bulky but you can pretty much arrange your paper or cardstock on the template that you want and run it thru the machine. So it helps in not wasting any cardstock or paper. I have already invested in the Quickutz so am not looking at acquiring the Sizzix or Sidekick at all but it is nice to finally try it out.

My brother-in-law pointed out to me just afer i started this blog that perhaps i ought to write something about what scrapbooking is all about as a starter. A really good point but i think i will leave that for another post. At this moment in time, if any of you would like to know what scrapbooking is all about, make a stop at Shabby Chic. Irene will be able to show you firsthand what this is all about.

Thursday, November 16, 2006

Scrapping magazines

The best place in Brunei where you can buy scrapbook magazines is in Booker International in Gadong. Without fail every month, they will have a couple of copies of Creating Keepsakes, Scrapbooking and Beyond and other British publications (sometimes there have Australian magazines too). Once they even had copies of Memory Makers. The unfortunate thing about Booker's magazine supply is that, as i was told by their staff, they do not have a say on which magazines they bring in. The selection is sent from Singapore with no input from Booker's staff.

I would buy Creating Keepsakes and Memory Makers whenever i come across them. But i've stopped buying Scrapbooking and Beyond as it does not quite fit my style of scrapbooking. The British publications are also not quite up to par but they often have freebies which makes them a tempting choice. Scrapbooks etc. is a pretty good magazine but hard to find. It is a really good buy as it is the only publication that costs less than $10. When i do by chance visit Paul and Elizabeth's Bookshop in Yayasan, i have found it on sale there but that's only 1 in maybe 5 visits if i'm really lucky.

What i do now is subscribe for my regular magazines thru Scrapping Gals. I only get 3 publications which are Creating Keepsakes, Paperkuts and my favourite, Simple Scrapbooks.

So check Booker out if you're interested in getting the magazines. Be warned though, they sell out pretty fast so be quick.

Internet Sales

I'm not sure what the season is in Singapore but my favourite scrapbook online site, www.pictures2pages.com is having a sale on all items. And its pretty fabulous too. 20% off all normal priced items and an additional 10% off any sale items.

Another pretty good site,
www.scrapbookingcove.com is also having a sale on. I've never really looked into scrapbooking cove until recently and was pleased that i did as i found that it had some supplies which i had been looking for for quite sometime now. Things like twill tape and Making Memories Antique Brads.

The only thing about ordering from these sites is that they are based in Singapore and i'm living in Brunei. There aren't any scrapbooking shops in Brunei and a Bruneian scrapper's only hopes are online orders. I've taken to getting friends and family to bring my orders home for me if anyone visits Singapore as shipping costs can be quite expensive.

Another good site to order from is www.scrappinggals.com of which i am a consultant for. The best thing about this site is that if we have enough orders and lump them all together, the shipping costs are free.

If you are interested in starting scrapbooking, do check these sites out. The Singapore sales are till the end of the month only.

Wednesday, November 15, 2006

Card making

My son had a minor operation on Monday and i took 3 days off work to stay home and take care of him. While he slept most of the day there wasn't much to do and since we recently connected to e-speed at home, i spent most of that time on the net.

I finally had the time to go back to My Place (
http://www.scrapbook.com/profiles/60237.html) at www.scrapbook.com and explored it carefully. Did one other blog there (as this one had was not formed till later in the day) and uploaded the pictures i had taken of the cards i had made (yes...all 3 of them).

At the time of the making of the cards, i was really proud of the results but now when i look back at the photos of them, i'm beginning to have second thoughts. They look so simple...too simple actually and too plain. Now don't get me wrong, i am still proud that i actually made cards to give away (2 weddings and 1 thank you) and i did have a real good time doing them so no regrets there. The only drawback about card making is that you don't get to keep them in an album. You give them away and never see them again. So sometimes it's really hard to take out those precious (and usually expensive) scrapbook supplies to be used.

I try now to use my scraps for making such cards so as not to waste. And regardless of the fact that card making will eat into my supplies, i will continue to make them and will continue to give them away.