Showing posts with label Scraps. Show all posts

Tuesday, February 13, 2007

Homemade cards

I was running through the Photos Folder on the computer and found these pictures I had taken of the 3 cards I made last year. Thought that I might as well post them on my blog too. (Note: I took these photos myself and did not 'clean' them up on Adobe as The Hubby would do...so I guess I'd better put in a disclaimer now to say that he had nothing to do with these photos that i have posted. Hehe...yes I did them all by myself!)

1. Love, honor, cherish


Materials: Textured Cardstock: Bazzil Basics Paper; Rub-ons and Card making template: Making Memories; Chipboard Heart: Heidi Swapp for Advantus.

This was my first attempt at card making. It was a really last minute thing for my Uncle (James and Christina) who were getting married the next day. Slapped on a few rub-ons and the heart and voila...done. I used a vellum phrase for the card sentiment on the inside (sorry no photo) which was inked on the edges with pink acrylic paint. Really basic stuff.

2. To Have and To Hold


Materials: Textured Cardstock: DCWV Card Making Stack; Patterned Paper: Chatterbox; Wedding Die-Cut: Ann Skelly for Lifetime Memories; Rub-on '&': Scrapworks; Alphabet Stamp: Hero Arts; Ink: Versamagic Chalk Ink by Tsukineko.

This was the 2nd wedding card that I made (for Steve and Wei) and again it was rather last minute. Both my Uncle and Wei did a wedding gift registry list with Innerspace and because I bought both wedding couples their gifts from there, I had to make an accompanying card. Usually, The Hubby and I would just give angpows with our names scribbled on the back.

With the 2nd card, I decided to rummage thru my stash of scraps and decided to make a simple border. The wedding die-cut (the book) is from my wedding scrapbook stash. Yes, I'm still in the process of finishing my wedding scrapbook...The Hubby reckons he will be old and with grandkids by the time I finish it. Hee.

For the inside sentiment, I just scribbled an appropriate message as I really had no time to try and do more.

3. Thank You


Materials: Textured Cardstock: DCWV Card Making Stack; Patterned Paper and Brad: Making Memories; Flower: Prima; Circle Punch: EK Success; Ink: Color On Pigment Ink by Ranger; Pen: ZIG Millenium.

This card was done at the behest of my 9 year old nephew who came by the house for chinese tuition one fine Sunday morning and asked me to help him make a Thank You card for his teacher in conjunction with Teacher's Day. I thought it was for his chinese tuition teacher so I rushed the production.

Again, paper and green cardstock are from my scraps stash and once I had decided on how to arrange the elements, it came together pretty quickly. I got my nephew to handwrite the 'Thank You' on the 2 punched circles for a more personal touch. Oh and after the card was completed, said nephew then tells me its actually for his class teacher in school. Grrrr!!

Thursday, November 30, 2006

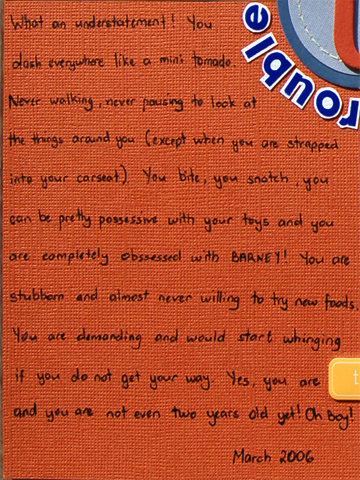
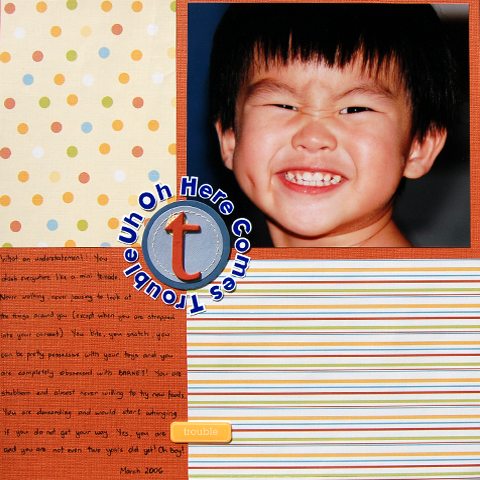
Uh Oh Here Comes Trouble

Hurrah more photos of my layouts. Hubby finally had time to take pictures of my layouts and i think the photo of this one has come out much better than the first one.
This placement of the paper and photo was inspired from a layout i saw in Simple Scrapbooks magazine (forgot what issue). This is one of my favourite layouts.


Materials: Textured cardstock: Bazzil Basics Paper; Patterned Paper, Stitched Tag: Chatterbox; Alphabet Chipboard: Heidi Swapp; Acrylic Paint, Word Tile and Alphabet Stickers: Making Memories.


If you can even read my really bad handwriting...congratulations!! Personally i detest my handwriting and i've even bought a book by Heidi Swapp called Love Your Own Handwriting which has exercises in it. I have not had a chance to go through the book properly yet (as i have tons of scrapbook idea books and magazines to read) but one of the things that Heidi Swapp strongly advocates is the use of your own handwriting in your pages, regardless of how bad it is. One day, when i'm long gone, perhaps my great grand children will look at this page and yes they will probably say "Damn what ugly handwriting great grandma had" but at least they will know what my handwriting looks like. Hee.


The original journalling that i had drafted for this picture was about my hopes and dreams for Ty and how i hoped that he would follow his own personal dreams but my brother-in-law said that it did not match the cheekiness of Ty's photo. And how right he was!! Cheers JW. (By the way, i still have not found a photo to match my original journalling...meaning to say there are no angelic photos of Ty!! LOL)

The MM Alphabet Stickers were stuck on white cardstock and painstakingly cut out by hand with my trusty Precision Tip Cutter Bee Scissors in order to make them stand out more. I was lucky enough to find acrylic paint (Poppy) for my raw chipboard letter 't' that perfectly matched the cardstock.

Tip: The front of the page looks normal but turn the layout around and you'll find gaping holes behind the picture and patterned paper. I cut them out as no one looks at the backs of the layouts anyway and I get to keep the cutouts as scraps for diecutting, punches or even as mats for other photos.

NB: The photo of Ty was taken by Hubby in March 2006 with my brother's trusty Canon 10D.